
We all have stayed in our homes more than ever in the last few months, and have learned how important is to have a space that we feel ourselves in. Now, with spring cleaning around the corner, it's the perfect moment to change and add little details into our home decor that make all the difference!
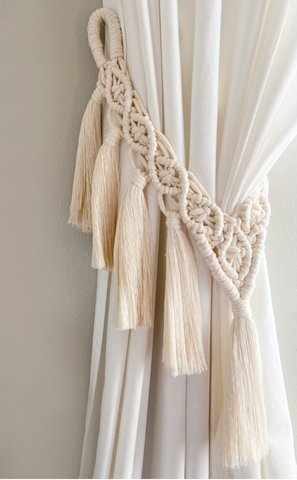
These macrame curtain tie-backs designed by Chelsea Garner from Knots and Naps are the perfect elegant and boho decoration for any space. A project that you can complete in an afternoon but that will give a curated style to your house for years to come.
So grab your cord and let's do this!
Here you have the video tutorial and below the written instructions
MACRAME CURTAIN TIE-BACKS
SKILL LEVEL – Intermediate
SIZE - 22” x 4”
MATERIALS
- GANXXET Soft Cotton rope Zero Waste 4mm - 1 Single Strand - Beige & Natural
- comb
- sharp scissors
- clipboard
- measuring tape
NOTES
-
Requires knowledge of diagonal clove hitch knot, square knot & gathering knot
-
Easiest made on a flat surface use a clipboard
-
Pattern consists of 9 total diamonds
-
DCHK= Diagonal Clove Hitch Knot, SK = Square Knot, GK=Gathering Knot
-
“Lead Rope” = rope is wrapped around and guides to create intricate designs
CUT ROPE:
8 pieces at 110”
2 pieces at 65”
1 piece at 20”
*Optional Add-On 4 Tassels-24 pieces at 14”*
MACRAME CURTAIN TIE BACKS - MAKES 1
Divide ropes into 2 sides each with 4 ropes at 110” & 1 rope at 65”
Let’s begin with side 1. Set aside the 2nd side.
Find center of each rope and fold in half
With the 1st side measure 3 inches from center fold this is where we will begin pinch rope to mark place.
Create a “gathering knot” with 65” rope leaving approx an 1” of the tail upright and folding rope down 6” in length and bring the rope back to the top where your mark is.
Beginning at the top wrap rope around all pieces and “gather” together until you reach 6” in length at bottom thread wrapping rope through bottom loop and pull top loop up to lock rope inside of gathering knot
Trim and tuck in ends
Fold in half and attach to clipboard
Separate ropes into to 2 sections of 4 ropes each
With 4 center ropes make a Square Knot
1st Diamond Shape:
Use the 4th rope from the left as your “lead rope” pull rope on an angle downward to the left to create the top of 1st diamond.
Use 3rd rope from the left attach to the “lead rope” use a “Clove Hitch Knot” repeat for a total of 2 CHK’s
Use the 2nd rope from the left repeat 2 CHK’s
Use 1st rope from the left repeat 2 CHK’s
Repeat process on right side to create top of our 1st Diamond Shape
Use 4th Rope from the right as “lead rope” pull rope on an angle downward to the right
Use the 3rd rope from the right attach to the “lead rope” use a “Clove Hitch Knot” repeat for a total of 2 CHK’s
Use the 2nd rope from the right repeat 2 CHK’s
Use 1st rope from the left right repeat 2 CHK’s
Use 2nd rope from left and 2nd rope from right create a Square Knot around the middle 4 ropes to create center of diamond
To complete bottom left side of diamond Use the 1st rope on the left your “lead rope” and pull rope on an angle downward to the right
Use 2nd rope from the left attach to the lead rope use CHK 2x’s
Use 3rd rope from the left attach to the lead rope use CHK 2x’s
Use 4th rope from the left attach to the lead rope use CHK 2x’s
Pull ropes to the side
To complete bottom of the right side of diamond use the 1st rope on the right (lead rope) and pull rope on an angle downward to the left
Use 2nd rope from the right attach to the lead rope use CHK 2x’s
Use 3rd rope from the right attach to the lead rope use CHK 2x’s
Use 4th rope from the right attach to the lead rope use CHK 2x’s
1st Diamond Shape Complete! Yay!
Keeping the right lead rope in left hand angle downward to the left to cross over left lead rope, use the 3rd rope from the left attach to lead rope with 2 CHK’s
Repeat the process above to create a total of 4 diamonds.
For the last diamond create a Square Knot Use the 4 center ropes to lock your knots
1st side is complete!
Grab your 2nd side ( 4 pieces @ 110”, 1 piece @ 65”)
Beginning with the Gathering Knot, repeat the entire process to from the beginning to mirror the pattern created on side 1.
Once completed, let’s connect the 2 sides together.
Attach both pieces to the clipboard.
Take 4 most center ropes and their closest ropes to the right (8th & 7th rope from the left & right) and make a SK that will connect the 2 sections tightly together.
To create the final diamond, select the 2 center ropes as your lead rope and with the 7th rope from the left create 2 CHK’s around the left lead rope
Use 7th rope from the left attach to the lead rope use CHK 2x’s
Use 6th rope from the left attach to the lead rope use CHK 2x’s
Use 5th rope from the left attach to the lead rope use CHK 2x’s
Mirror process on right side
Select the 2 center ropes ( 7th & 8th rope from the right) as your lead rope and use the 2 CHK’s wrap around lead rope on a Diagonal.
Use 7th rope from the right attach to the lead rope use CHK 2x’s
Use 6th rope from the right attach to the lead rope use CHK 2x’s
Use 5th rope from the right attach to the lead rope use CHK 2x’s
Select 6 ropes in the middle of diamond shape and make a SK
Complete the bottom left angle of the diamond by wrapping the 6th rope from the left around the left lead rope with CHK 2xs
Use 7th rope from the left attach to the lead rope use CHK 2x’s
Use 8th rope from the left attach to the lead rope use CHK 2x’s
Mirror process on right side
Complete the bottom right angle of the diamond by wrapping the 6th rope from the right around the right lead rope with CHK 2xs
Use 7th rope from the right attach to the lead rope use CHK 2x’s
Use 8th rope from the right attach to the lead rope use CHK 2x’s
To lock in the bottom of the diamond create a SK use the 4 center ropes
Final Diamond complete! You’ve got this!
To finish the design, we will create a “Diagonal Clove Hitch Knot Border” that will encompass all of our ropes inside of it to create a clean edge
“Diagonal Clove Hitch Knot Border”
Begin with the 1st & 2nd ropes on the left as our 2 Lead Ropes
Pull ropes on an angle downward to the right
Use 3rd rope from the left attach to the lead rope use CHK 3x’s
Here’s the tricky part - Take the 3rd rope and pull it into your 2 lead ropes on a downward angle to hide it inside our border
Use 4th rope from the left wrap around the 3 lead ropes use CHK 3x’s
TIP: as you add to your border make clove hitch knots tighter to keep consistency in size
Take the 4th rope and pull it into your lead ropes
Use 5th rope from the left wrap around the 4 lead ropes using CHK 3x’s
Take the 5th rope and pull it into your lead ropes
Use 6th rope from the left wrap around the 5 lead ropes using CHK 3x’s
Take the 6th rope and pull it into your lead ropes
Use 7th rope from the left wrap around the 6 lead ropes using CHK 3x’s
Take the 7th rope and pull it into your lead ropes
You should now have 7 total pieces or rope inside your border.
Use 8th rope from the left wrap around the 7 lead ropes using CHK 2x’s
Repeat “Diagonal Clove Hitch Knot Border” instructions on the right side!
In the homestretch!
Flip-piece over.
Grab your 20” piece of rope
Create a Gathering Knot grab all ropes in left hand with right hand use 20” rope wrap around 5 times thread end through loop, pull to lock in tight and seal knot.
Trim tails. Tuck ends.
Flip over to the front.
Measure 6” below gathering knot and trim (longer or shorter if desired).
You may leave rope as is OR you can use your brush to comb out fringe for a softer look.
**OPTIONAL ADD ON**
Attach 4 Tassels to loops on the outer edge of design for a more dramatic effect.
Take 24 pieces at 14” divide into 4 sections with 5 pieces of rope each
TIP: You can use your scrap pieces that are long enough for your tassels
Keep 4 (14”) remaining pieces for gathering knots
Flip the piece over and attach tassels from the back to make the gathering knot look clean.
Take the 1st section of 5 and place on the first loop
Fold in half.
Take 1 - 14” piece and make a gathering knot,
Wrap rope around tassel 3 times, thread end through loop and pull, trim tails, tuck ends.
Repeat process for remaining 3 tassels.
Once all are attached using a pet brush or comb to brush out tassels.
Measure 6” below the gathering knot and trim precisely.
You did it! What a journey. Enjoy your handmade Macrame Curtain Tie- Backs.
Attach to wall using 2 metal screw hooks.
©2021 GANXXET, all rights reserved.


